
Showing posts with label Moto Morini 3 1/2 Strada. Show all posts
Showing posts with label Moto Morini 3 1/2 Strada. Show all posts
Wednesday, 7 October 2015

Sunday, 27 September 2015
Bolting stuff back on as quickly as possible
I kno some of this will need to come off again but it's so much easier to work out things like wire routing when all of the main pieces are together, plus I'm scunnered at looking at piles of bits across my garage.
At least now they're collected in one pile.


Also couldn't resist trying on these for size.

Of course none of this actually get me any closer to getting it running, I did connect a battery and found the brake light works but thats pretty much it for the moment.
And when I seriously try and get it started is when I find out if anythings leaks or falls off.
At least now they're collected in one pile.


Also couldn't resist trying on these for size.

Of course none of this actually get me any closer to getting it running, I did connect a battery and found the brake light works but thats pretty much it for the moment.
And when I seriously try and get it started is when I find out if anythings leaks or falls off.
Thursday, 24 September 2015
A couple of quick photos.
 Here are the cleaned and revamped carburettors now in situ.

The mess of wiring will now be needing sorted, routing it is the biggest headache as I doubt it was standard when I got it, there seems to be a few random wires and bodge job fixes to it, dont know whether to try and rationalise it or just get it working first and worry about that afterwards.


The mess of wiring will now be needing sorted, routing it is the biggest headache as I doubt it was standard when I got it, there seems to be a few random wires and bodge job fixes to it, dont know whether to try and rationalise it or just get it working first and worry about that afterwards.
Wednesday, 23 September 2015
Click.....bzzzzzz!
Looking at the sight of a pile of bits for a year or so has been exasperating so I've made a decision to start bolting stuff back together in the full knowledge that I'll need to deal with a few issues later. Possibly meaning taking it to bits again but in the meantime the engine is back in the frame and a few bits are reattached.
Unfortunately it hasn't left the confines of my now cluttered garage to enable a few photographs to record this so this is all there is.
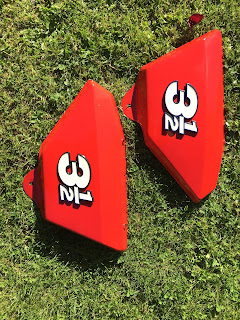
Hastily rattle canned side panels.
The tank is being prepped too but is revealing about five previous coats of paint and has proved problematic to get flat again.
Wiring will be the next puzzle, it was a mess to start with but I'll need to just re-attach it before working out which bits are still relevant and which are left over from a previous owners attempts to modify things.
Bizarrely, the brake offset proved all but impossible to fix so I had to resort to buying a reconditioned OE disc and matching non sintered soft pads, so the brake system has been refitted and will need cleaned and adjusted when I get time.
Unfortunately it hasn't left the confines of my now cluttered garage to enable a few photographs to record this so this is all there is.
Hastily rattle canned side panels.

Wiring will be the next puzzle, it was a mess to start with but I'll need to just re-attach it before working out which bits are still relevant and which are left over from a previous owners attempts to modify things.
Bizarrely, the brake offset proved all but impossible to fix so I had to resort to buying a reconditioned OE disc and matching non sintered soft pads, so the brake system has been refitted and will need cleaned and adjusted when I get time.
Monday, 17 March 2014

It now has its face back, at least for now, I suspect I'll need to take some of it back off to check the wiring when I can.
The bars are new, the old set, while perfectly servicable came off something else and the knurled sections didn't match the clamps so I bought these ones, they are pattern ones for a old BSA -A, B and M models, they are slightly pulled back than the other ones but look fine.
The wiring is getting complicated now as I try and figure out what connects where, I think this will be the hardest part to get right.
Tuesday, 11 March 2014
Still here

This was that brake disc posted previously, left in a bath of.....tesco cola for two days it cleaned up quite well.
I'll paint the carrier part with HT paint (though the first attempt looks very splotchy) before bolting onto the wheel.
I've decided that I'll shave 2mm off the lower mount of the caliper and use a thinner spacer for the top mount to compensate for the difference in offset of this disc compared to the original one.
Both carbs are now cleaned, a new set of bars will be here shortly. Mudguards have been stripped of paint and I need to decide how to finish them.
Footpegs are sprayed a satin black and ready to fit so though nothing has progressed much I've done afew things at least.
Friday, 26 April 2013
On its wheels again
Sitting back on its wheels again, though only for a bit as it'll all need to come off again at some stage.
.jpg)
Its at this stage where a lot of the frustrating jobs begin. I managed to bend the centrestand mount, mainly due to the stupid design which needs one steel tube to fit inside another instead of,say, a collar at each end, hopefully it wont cause problems later.
The forks seem to sit very high but I'm guessing thats because theres no weight on them yet.
.jpg)
The forks seem to sit very high but I'm guessing thats because theres no weight on them yet.
Monday, 22 April 2013
The rebuild finally starts
After a long winter where nothing was touched I've finally started to put bits back together.
Yesterday was spent pounding the swingarm spindle with a mallet in an attempt to get it all the way through the frame, I loosened off the two guide plates that bolt to the centre of the frame and it finally went through, a few turn engaged the threads on the chain side and it seemed to be quite secure.
The headstock is seated as I finally obtained enough quarter inch bearings to fill the race.
.jpg)
I also wanted to bolt on the new shocks. these were attached using the old bolts, if I waited until everything was cleaned or replaced with shiny new bits it would sit in my garage forever.
Getting it together is the prioity, replacing the old bolts and fasteners cane be done afterwards.
.jpg)
Tuesday, 5 March 2013
Not so shiny bits
The search for bits continues, I had wondered about the OE disc, they are chromed and this one is quite corroded and pitted so was on the lookout if anything suitable showed up that would be an easy bolt on fix.
I bought this from a German ebay seller.
.jpg) The apparantly rusty disc on the right is a direct replacement for the original one on the left that I took off the bike , it probably came off a Ducati Pantah but is the right size and offset and with a little clean up I'll paint the inside carrier ring
The apparantly rusty disc on the right is a direct replacement for the original one on the left that I took off the bike , it probably came off a Ducati Pantah but is the right size and offset and with a little clean up I'll paint the inside carrier ring
I bought this from a German ebay seller.
.jpg)
Monday, 11 February 2013
Tyres
After a few months I finally have tyres on my wheels.
Bridgestone BT45's
.jpg)
Hopefully this will mean I will be able to partly assemble a running frame soon and have all of the scattered bits back in one place.
Bridgestone BT45's
.jpg)
Hopefully this will mean I will be able to partly assemble a running frame soon and have all of the scattered bits back in one place.
Saturday, 17 November 2012
I have wheels
After what seemed like an endless search I finally found a nearby shop that did beadblasting, so after a few days I picked up the newly powdercoated wheels.
This place- P&J Powder Coatings
.jpg)
They are more or less the same colour as the originals.
Its slightly exasperating that the removal of old, purchase and refitting of new bearings cost a lot more than the powdercoat process itself, especially as their was nothing wrong with them in the first place.
There is a little bit of overspray to remove from the drum brake to clean it up but thats them ready for refitting.
I've put off fitting tyres for a bit and will look around at my options, currently considering Bridgestone BT45's, but that may change.
This place- P&J Powder Coatings
.jpg)
They are more or less the same colour as the originals.
Its slightly exasperating that the removal of old, purchase and refitting of new bearings cost a lot more than the powdercoat process itself, especially as their was nothing wrong with them in the first place.
There is a little bit of overspray to remove from the drum brake to clean it up but thats them ready for refitting.
I've put off fitting tyres for a bit and will look around at my options, currently considering Bridgestone BT45's, but that may change.
Friday, 12 October 2012
Shiny forks
I've finally managed to put these back together
The fork legs were rechromed by Philpots and should last as long as the rest of the bike does now.
After a bit of fiddling I refitted the dampers and pushed in the new seals and they seem to sit well.
The only thing left to do now is add fork oil but I'll wait until I need to fit them before doing that.
The fork bottoms were cleaned as well as I could and sprayed black and coated with laquer, they'll probably need redone at some stage but they are much better than the horrible rashed red they were when I got them.
.jpg)
The fork legs were rechromed by Philpots and should last as long as the rest of the bike does now.
After a bit of fiddling I refitted the dampers and pushed in the new seals and they seem to sit well.
The only thing left to do now is add fork oil but I'll wait until I need to fit them before doing that.
The fork bottoms were cleaned as well as I could and sprayed black and coated with laquer, they'll probably need redone at some stage but they are much better than the horrible rashed red they were when I got them.
.jpg)
Shiny shocks
New shock arrived today, I wasn't going to replace these but the old ones did look really tatty,even if thats not clear in the photos.
The new ones are budget items from Tecbikeparts who mostly do Triumph parts and they were only £45 so I felt I could just get them without breaking any budgets.
.jpg)
Old ones on the left, new ones on the right with the black body. I did have a choice of colours but felt this one was favourite
The new ones are budget items from Tecbikeparts who mostly do Triumph parts and they were only £45 so I felt I could just get them without breaking any budgets.
.jpg)
Old ones on the left, new ones on the right with the black body. I did have a choice of colours but felt this one was favourite
Thursday, 30 August 2012
Wheels
When I first got this bike I knew the wheels needed recoating and now I've started to get them ready.
I had already noted that the tyres were a bit past it...... that was the front tyre that was dated 2002, the rear was a much more vintage 1988! - probably April of that year, an impressive 24 years old and were so stiff I ended up cutting it off the rim.
To think it was riding about the streets less than a year ago.
.jpg)
The rear looks to be in decent condition but the front is fairly poor with lots of flakey paint and alloy corrosion all over it.
I may get them painted rather than powdercoated, apparantly the closest matching colour is 'Skoda' gray though I think a darker grey may look better.
I had already noted that the tyres were a bit past it...... that was the front tyre that was dated 2002, the rear was a much more vintage 1988! - probably April of that year, an impressive 24 years old and were so stiff I ended up cutting it off the rim.
To think it was riding about the streets less than a year ago.
.jpg)
The rear looks to be in decent condition but the front is fairly poor with lots of flakey paint and alloy corrosion all over it.
I may get them painted rather than powdercoated, apparantly the closest matching colour is 'Skoda' gray though I think a darker grey may look better.
Rattle can frenzy
I turned my attention to the alloy fork bottoms and finally finished them off, though not perfect a coat of primer and a few coats of satin black have made them look quite good.
I'll consider whether I should laquer them afterwards.
I've also started to refit the steering head bearings, the first piece to go back onto the frame.
I'll consider whether I should laquer them afterwards.
I've also started to refit the steering head bearings, the first piece to go back onto the frame.
Saturday, 18 August 2012
North Leicester Motorcycles is pretty much the only place you can get some of the more obscure parts for old Morini bikes and I went there for the first time last week.
It reminded me of an old ironmongers shop, the like of which you dont get anymore with almost any part you care to name in stock.
I came back with a centrestand bolt and the hollow spacer it goes through, the old one of which I had to blowtorch off the frame, and some assorted gaskets and a new set of half rings- I was initially surprised to discover there are three different shapes of these, fortunately I got the correct ones as I forgot to take any samples with me.
I was initially disappointed to find the new half rings didn't seat onto the new castle nuts, but while looking at them all it struck me the ones that I removed from the from outlet was oxidised red- rust = steel and therefore too hard to easily file to fit. The new ones didn't seem as heavy but were hard, after checking with a magnet, the smaller old set and the new set were not steel and five minutes of trimming with a file and the new half rings nested comfortably into the new exhaust nuts.
.jpg) The two nuts in the foreground are the ones that were on the bike, the half rings were on the front outlet held by the nut on the right, they nest in that one easily, they dont fit into the other one or the new ones at the back.
The two nuts in the foreground are the ones that were on the bike, the half rings were on the front outlet held by the nut on the right, they nest in that one easily, they dont fit into the other one or the new ones at the back.
The new half rings(at the rear right) fitted after a bit of trimming.
It reminded me of an old ironmongers shop, the like of which you dont get anymore with almost any part you care to name in stock.
I came back with a centrestand bolt and the hollow spacer it goes through, the old one of which I had to blowtorch off the frame, and some assorted gaskets and a new set of half rings- I was initially surprised to discover there are three different shapes of these, fortunately I got the correct ones as I forgot to take any samples with me.
I was initially disappointed to find the new half rings didn't seat onto the new castle nuts, but while looking at them all it struck me the ones that I removed from the from outlet was oxidised red- rust = steel and therefore too hard to easily file to fit. The new ones didn't seem as heavy but were hard, after checking with a magnet, the smaller old set and the new set were not steel and five minutes of trimming with a file and the new half rings nested comfortably into the new exhaust nuts.
.jpg)
The new half rings(at the rear right) fitted after a bit of trimming.
Thursday, 9 August 2012
Back in March I went to the Scottish bike show, I usually avoid these glorified jumble sales but the Moto Morini owners club had a stand and I wanted a look.
It was good to have a look at another 350 and best of all I discovered that the panel badges were available from them at a very modest price, I was also going to get tank badges but only had a small amount of cash in my pocket, at least I know they are available and where to get them rather than the chancer on ebay who sells them at four times this price despite getting them from the same source.
Usefully they also had the little rubber bungs that secure the side panels so got some of those too.
.jpg)
I may try and visit North Leicester Motorcycle next week,who are the main suppliers of Morini bits in the UK.
On my list are a few small but awkward to source parts like the centrestand bolt and spacers.
Also I've discovered I need new half rings as, oddly, after comparing the shiney new castle nuts I've found they are the same as only one of the old ones, the really tight one on the front that caused me all the problems is bigger- a different colour and taller than the rear one and its internal diameter is bigger.
Probably another bodge by a previous owner. Fortunately the new nuts seem to fit securely into the exhaust ports so at least that hasn't been damaged.
It was good to have a look at another 350 and best of all I discovered that the panel badges were available from them at a very modest price, I was also going to get tank badges but only had a small amount of cash in my pocket, at least I know they are available and where to get them rather than the chancer on ebay who sells them at four times this price despite getting them from the same source.
Usefully they also had the little rubber bungs that secure the side panels so got some of those too.
.jpg)
On my list are a few small but awkward to source parts like the centrestand bolt and spacers.
Also I've discovered I need new half rings as, oddly, after comparing the shiney new castle nuts I've found they are the same as only one of the old ones, the really tight one on the front that caused me all the problems is bigger- a different colour and taller than the rear one and its internal diameter is bigger.
Probably another bodge by a previous owner. Fortunately the new nuts seem to fit securely into the exhaust ports so at least that hasn't been damaged.
Saturday, 12 November 2011
The frame is now recoated, RAL 3020, Traffic Red. A bit brighter than I had really wanted but as I'll get the rest of the paintwork to match it should all look the same.
I had it coated by a firm in Kilmarnock, most of it is OK but they promised to press out the swingarm bearings and never bothered, instead powdercoating them in place and affecting the finish around the bearing by allowing the grease to run out and spoil the finish, Sloppy work but it wont be seen when the swingarm is refitted thankfully, I'll need to take it to a local bikeshop who'll press out the old bearings and refit the shiny new bronze ones I have bought.
 The seal kits for the carbs have arrived and I'll wait until I have cleaned the carb bodies up properly before reassembling them, I may yet have to send them away to get this done properly.
The first of the forks is now disassembled, I puzzled awhile over the circlips holding the seals in place as there seemed no obvious way to get them out, but when the grime was wiped away I noticed one end was tapered out and the other tapered into the fork bottoms, a small screwdriver was then used to catch one end and lever it inwards and upwards slightly which gave me enough purchase to remove it completely.
I'll make a start on stripping the horrible red paint first but both slider legs will need rechromed which is a real pain, it explains how they were both leaking though.
As with may of these little jobs, its only when you start them you find your missing a little tool to make it a straightforward task, in this case a 12mm allan key to undo the top fork bolt.

I had it coated by a firm in Kilmarnock, most of it is OK but they promised to press out the swingarm bearings and never bothered, instead powdercoating them in place and affecting the finish around the bearing by allowing the grease to run out and spoil the finish, Sloppy work but it wont be seen when the swingarm is refitted thankfully, I'll need to take it to a local bikeshop who'll press out the old bearings and refit the shiny new bronze ones I have bought.

The first of the forks is now disassembled, I puzzled awhile over the circlips holding the seals in place as there seemed no obvious way to get them out, but when the grime was wiped away I noticed one end was tapered out and the other tapered into the fork bottoms, a small screwdriver was then used to catch one end and lever it inwards and upwards slightly which gave me enough purchase to remove it completely.
I'll make a start on stripping the horrible red paint first but both slider legs will need rechromed which is a real pain, it explains how they were both leaking though.
As with may of these little jobs, its only when you start them you find your missing a little tool to make it a straightforward task, in this case a 12mm allan key to undo the top fork bolt.

Wednesday, 2 November 2011
Gubbins
A Dellorto VHBZ 25BS carburettor

Pretty much all the seals are past it and will need replaced.
A new seal kit is ordered and I'll fit them after I clean all the little bits. The internal components don't look too bad actually, I think I'll have a trickier task getting the outside of it clean.
The throttle stop screw was 2 full turns and one eighth turn out from fully in.
A Dellorto VHBZ 25BS carburettor

Pretty much all the seals are past it and will need replaced.
A new seal kit is ordered and I'll fit them after I clean all the little bits. The internal components don't look too bad actually, I think I'll have a trickier task getting the outside of it clean.
The throttle stop screw was 2 full turns and one eighth turn out from fully in.
Friday, 28 October 2011
After a week of blow torching and hammering I've decided to take the frame into Carrick Engineering in Prestwick, for a modest amount they'll remove the broken bolt and sleeve using acetylene torches and brute force meaning I can then strip the frame and feel like I'm starting to something constructive rather than destructive.

Recognising I don't have the appropriate tools to do these jobs is something that I'll realise quicker in the future though half the fun is in trying yourself.
At least its not occupying all of my time now and I'll start with stripping the powdercoat first.
I'll fire up the blowtorch and hope it doesn't rain all weekend.The other alternative is traditional paint stripper which is fairly ineffective against powdercoat so I'm told or gasket stripper which is fierce but quite nasty stuff to work with.
The bearing cups are off and I removed the steering lock, annoyingly the little lock cover you can see in the previous pictures went flying into space when I hammered it off, I then wasted the best part of an hour looking for it before resigning myself to making another one from brass sheet.
I was all ready to drill out the lock and just quickly checked a website for info on the exact drilling point to avoid the hardened tumblers inside when I noticed 'the quick way'- number 3 on here-
http://w6rec.com/duane/bmw/lock/index.htm
14 seconds later the lock was out.
Just as one sheared bolt is fixed another two come along to try my patience, I think I'll grind off the captive nuts on this though and get new ones tacked on in the same position.


Recognising I don't have the appropriate tools to do these jobs is something that I'll realise quicker in the future though half the fun is in trying yourself.
At least its not occupying all of my time now and I'll start with stripping the powdercoat first.
I'll fire up the blowtorch and hope it doesn't rain all weekend.The other alternative is traditional paint stripper which is fairly ineffective against powdercoat so I'm told or gasket stripper which is fierce but quite nasty stuff to work with.
The bearing cups are off and I removed the steering lock, annoyingly the little lock cover you can see in the previous pictures went flying into space when I hammered it off, I then wasted the best part of an hour looking for it before resigning myself to making another one from brass sheet.
I was all ready to drill out the lock and just quickly checked a website for info on the exact drilling point to avoid the hardened tumblers inside when I noticed 'the quick way'- number 3 on here-
http://w6rec.com/duane/bmw/lock/index.htm
14 seconds later the lock was out.
Just as one sheared bolt is fixed another two come along to try my patience, I think I'll grind off the captive nuts on this though and get new ones tacked on in the same position.

I have found that you can get clamp that encircles the pipe with a captive bolt attached and that may be an easier option meaning I just need to grind of the broken bolts and clean up any remaining weld.
Subscribe to:
Posts (Atom)